Table of Content
In this post, I want to share with you the simple steps and quick tips on how to make a wood sign on a budget. With the rest of the interchangeable pieces, cut a 2-inch fuzzy piece of Velcro and remove the adhesive strip from it. Place the fuzzy piece on the tooth piece of Velcro already stuck to the board. Once all transfer tape is removed, use the scraper tool to burnish down all vinyl pieces to ensure they are all well adhered to the board.
I ended up going back over the blue letters with the white paint. Bring the ends of each piece flush with its neighbor, and use three clamps to bring together the glued-up assembly. The waxed paper will prevent glue from dripping all over the clamps and workbench. Punch holes throughout the paper wherever there are "X"s.
Display your address number sign
Suppose you want to promote your laundry organization with the board signs on the front door of your shop. Then this DIY farmhouse laundry sign will hit perfect for it. Get your DIYer nature to do something unique and impressive. In this idea, we make a wooden signboard for laundry, but you can also customize it according to your design. When the stencils are placed where you want it on the wood sign board, lightly dab the paint all over your stencils.
Are you also fond of making cute and beautiful home sweet home sign; so here is the best and comfortable idea available. Any cracks in a wooden cutting board put you—and your guests—at risk of smearing butter that's riddled with bacteria. Check your board for cracks beforehand, or opt for another serving surface if you're unsure. The problem with this technique is that it can quickly become unsanitary. Once the whole address number sign pattern is covered with chalk, position it onto your sign board, and tape it in place. Then trace the outlines of the letters and numbers with a ballpoint pen.
Handmade Fried Green Tomatoes Kitchen Sign
Given the amount of sun my front door gets, painting it would not be a good idea. Tape the paper to the plywood board and begin drilling holes in the board where the original "X"s were marked. After done drilling, remove the papers from the board. If you want to protect your outdoor wood sign and have it last for decades, these simple techniques will help. We’ve rounded up some extra solutions on how to make a wood sign without stencils. These approaches will take you a bit more time, but certainly will save you a bunch.
I have been thinking of making these beautiful signs for holiday gifts…I saw some beautiful pallet wood boxes with decorative chicken wire that I fell in love with. Have you ever painted on pallet wood before, and would you suggest sanding the wood before painting, or, go with the whole rustic look? I personally like the rustic look, but didn’t know if it would paint on smooth. Also was wondering if you would suggest painting with a brush, or using a paint pen on this pallet wood? Make a greeting welcome card for your front door by following this farmhouse-style inspired home sign idea.
Step 4:
Use a lint-free cotton cloth and wipe all surfaces of the board with food grade mineral oil. Let the oil soak in for an hour and then take another pass with the oil. The board can withstand some moisture, but it’s not dishwasher safe. To clean it, wipe it off with a clean moist cloth or lightly moistened sponge. Depending on how much use the board gets, wipe the board down occassionally with fresh mineral oil. A good rule of thumb is to rejuvenate the board with oil every two months.
For our french fry charcuterie board, we put the shoestrings and sweet potatoes fries near the ranch dip on one side of the board. The Tater Tots fit right between the nacho cheese and guacamole, while the curly fries and crinkle-cuts contrast each other nicely in the middle. The waffle fries cover the other side of the board, nestled near the ketchup and fry sauce.
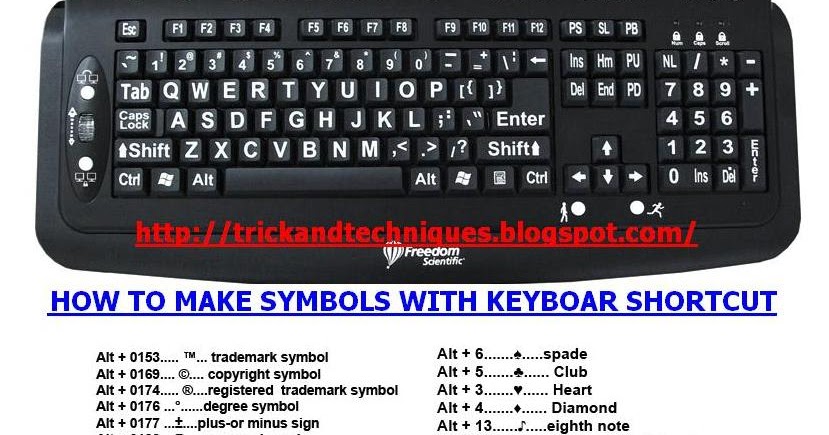
Solution 1: Make Custom Wood Signs with Chalk
Since this is a board full of piping hot fries, you’ll need to build time into your schedule to bake them right before assembly. If you don’t have enough oven space, rely on an air fryer or toaster oven to help you out. Otherwise, heat up a few trays at a time in the oven, and rewarm them at 200°F if necessary before putting everything together.
If possible, recoat the DIY wood signs for outdoors in one or two years. When you have your wood board customized to the size you want, sand the wood board with a piece of sandpaper till the surface and edges become smooth. The interchangeable pieces are used in place of the letter "O" in the word HOME. You can choose to cut the designs out of Heavy Chipboard on a Cricut Maker or out of Kraft board in either the Cricut Explore or Cricut Maker. This is the method I have been using for some time also with 1 slight difference, I simply tape my tracing paper to my computer monitor and trace the image. This conserves ink or if your printer is broken this is the solution.
Update your exterior with handmade decoration by following this DIY house number sign. Never go with the traditional plates of wood for your front door; make something unique for your home decoration by utilizing your crafty skills. This DIY house number sign project will be a perfect choice in this regard. You can use the artificial or natural flower this DIY project to make it more admirable and functional. Whenever you're getting bored and want to make something fun and amusing, then try this DIY rustic USA wood sign idea.
They were also two different types of paint pens. The blue was a Sharpie paint pen, which I got frustrated with. The color didn’t match the cap, and the paint didn’t flow smoothly. Even the best finishes wear down over time when being exposed to sun and rain.
Rustic-styled signboards are trending nowadays because they are very easy to make and require very inexpensive supplies for their creation. The classic rural series inspires this rustic farmhouse-inspired DIY shiplap sign idea. After using it once, you will love to hang signboard ideas on your home's wall furthermore. Get inspiration from these easy DIY wood signs & free printables to make things decorative for your beloved friends.


No comments:
Post a Comment